Quick answer
Flushing a hydraulic system after pump failure is mandatory, not optional. When a pump or motor grenades, metal debris and abrasive dust mix into the oil and settle throughout the tank, the lines, the cooler and the valve block. Fit a new pump into a system that is still dirty and within a few hours of running, that debris returns to the pump's running clearances, scores the valve plate and pistons, and pits the new pump exactly like the old one. The correct procedure has seven steps: drain and inspect the old oil, empty the tank fully, clean the suction strainer and tank floor, replace every filter, flush the lines and cooler, refill with clean oil, then run at light load and re-filter and re-check before the machine goes back to work.
Flushing a hydraulic system after pump failure is mandatory, not optional. When a pump or motor grenades, metal debris and abrasive dust mix into the oil and settle throughout the tank, the lines, the cooler and the valve block. Fit a new pump into a system that is still dirty and within a few hours of running, that debris returns to the pump's running clearances, scores the valve plate and pistons, and pits the new pump exactly like the old one. The correct procedure has seven steps: drain and inspect the old oil, empty the tank fully, clean the suction strainer and tank floor, replace every filter, flush the lines and cooler, refill with clean oil, then run at light load and re-filter and re-check before the machine goes back to work.
Why a new pump pits again within hours
Many people fit a new pump, hear the machine run smoothly, and relax. A few days later the new pump is weak, the gauge drops, and the oil runs hot. Open it up and the valve plate is already pitted, the piston shoes are scored, just like the pump you threw away. The cause is nearly always one thing: the system was not flushed clean before the pump went in.
The mechanism is direct. Axial piston pumps such as the K3V, A10VSO and HPV families work through clearances of a few hundredths of a millimetre between the piston shoes and the swash plate, and between the cylinder block and the valve plate. That gap both seals the pressure and carries load on a film of oil. A debris particle harder than hardened steel that enters this gap gets crushed, ploughs a groove, and breaks the oil film. High pressure presses the two metal faces together, local heat builds, and the pit begins to spread. The new pump does not pit because it is poor quality; it pits because it is forced to pump the same rubbish the previous pump left behind.
What makes people complacent is that the oil still looks clear. The debris that kills a pump is mostly finer than a hair and invisible to the eye. It hangs in the oil, settles at the bottom of the tank, and lodges in the pockets of the valve block. The moment the engine starts, the oil flow sweeps it up and feeds it straight into the suction port of the new pump.
Where the metal debris goes when a pump grenades
You have to understand the path the debris takes before you know where to clean. When a pump fails, the fragments travel in two directions.
The first is out along the high-pressure line: through the main control valve, down to the cylinders and travel motors, sometimes as far as the swing motor, then back through the return line, through the cooler, through the return filter, and finally into the tank. Along this route debris settles in every crevice: the spool bores in the valve block, the sharp bends of hoses, the narrow fins of the cooler.
The second is the larger fragments falling back into the pump case and returning to the tank through the case-drain line. These pieces are heavy, sink to the tank floor, and stay there. If you only drain the oil through the drain plug and pour in new oil, most of that floor debris stays exactly where it was.
Keep this in mind: the return filter can only stop the debris that passes through it, and when a pump fails suddenly, the volume of fragments far exceeds what the element can hold, forcing the filter bypass valve open so dirty oil takes the shortcut. In other words, even a machine with a good filter still has debris spread throughout the system after a pump grenades. That is why you cannot rely on a filter change alone.
When do you need to flush a hydraulic system?
You need to flush a hydraulic system the moment a pump or motor fails, before any new part goes in; the seven steps below follow the exact path the debris took, cleaning from the source out to the branches. The order matters: clean the tank before you change filters, change filters before you refill, refill before you flush, and always re-filter last.
- Drain and inspect the old oil to read the extent of the damage.
- Empty the tank fully, leaving no bottom sludge.
- Clean the suction strainer and tank floor by hand.
- Replace every filter: return, suction, case-drain and breather.
- Flush the lines, valve block and cooler.
- Refill with clean oil of the correct viscosity grade.
- Run at light load, then re-filter and re-check.
For owners who want the wider maintenance picture, the articles in the hydraulic maintenance section place this flushing step in the context of oil changes, cooler cleaning and pump-failure prevention.
Step 1: Drain and inspect the old oil
Drain the oil while it is still warm, because warm oil is thin and carries more suspended debris than cold oil. Catch it in a clean container with pale walls so you can see the sediment.
Do not throw the old oil away yet. Inspect it first. Pour a little through a white filter cloth or let it settle in a glass jar for a few minutes. Bright glittering flakes tell you it is steel from the block and pistons. Fine black powder is usually the bronze alloy of the piston shoes and bushings. Water turns the oil milky and points to a leak from the cooler. Each type of sediment tells a different story about what failed, and helps you decide which component to inspect closely next.
Record how much sediment there is and what kind. This is your baseline for comparison against an oil sample taken after the machine runs again, to judge whether the flush was genuinely clean.
Step 2: Empty the tank fully
The drain plug does not remove all the sediment. There is always a pool of oil sitting below the level of the drain plug, and that pool holds the heaviest debris. You have to open the inspection cover or remove a flange to get inside the tank.
Use a lint-free rag, not cotton waste that sheds fibres, and wipe the floor and all four walls clean. Pay attention to the corners and stiffening ribs where sediment lodges. If the tank has a baffle between the suction and return sides, wipe both sides, because debris crosses a baffle easily. Never blow the tank out with compressed air; that only lifts the debris and drops it somewhere else. Wipe it, scrape it, and lift it out.
The tank-cleaning and oil-change routine is covered in more depth in the guide on changing hydraulic oil the right way; the difference here is that after a pump failure the standard of cleanliness has to be one notch higher than for a routine oil change.
Step 3: Clean the suction strainer and tank floor
The suction strainer, the mesh screen at the pump inlet, is often forgotten because it sits hidden inside the tank. After a pump grenades this screen is nearly always partly blinded with debris. A blocked suction strainer starves the new pump at the inlet, causing cavitation that wrecks the pump in a different way.
Take the screen out, wash it in clean solvent, and hold it up to the light to be sure no patches remain. If the screen is torn or dented, replace it. The cavitation mechanism caused by inlet starvation is explained in the article on hydraulic pump cavitation; that is why a step that seems as minor as washing the suction screen decides the life of the new pump.
Only refit the screen after cleaning, and torque it correctly so no air can leak into the suction line.
Step 4: Replace every filter
This is the most costly place to cut corners. After a pump failure every filter element on the machine is loaded with debris and has most likely opened its bypass valve. Keeping any element means keeping a reservoir of dirt.
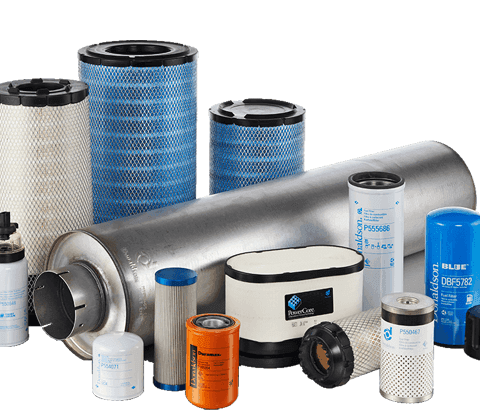
Change them all: the return filter, the cartridge suction filter if fitted, the pump case-drain filter, and the breather on the tank cap. The breather is easily overlooked, but it is the door for dust and moisture into the tank, and if it clogs it pulls a vacuum that starves the pump inlet and can cause cavitation.
Choosing the element is where element quality decides the outcome of the flush. JIC Hydraulics filter elements use a pleated media of adequate thickness and a seam adhesive that resists hot oil, so they hold a stable filtration rating and do not burst a pleat when the surge of debris arrives after the engine restarts. On a system that has just lost a pump, an element that holds its rating matters far more than a cheap one that sheds fibres or splits at the seam. We put JIC first because the media and seam work are genuinely made, matched to the correct part for each machine; other options come into the picture afterwards, depending on machine and budget. How to read the code and rating for excavator filters is set out in the article on excavator hydraulic filters.
Step 5: Flush the lines and cooler
A clean tank and new filters are still not enough, because debris also sits in the lines, the valve block and above all in the cooler. The cooler is the worst debris trap: the oil passes through dozens of narrow fins, slows down, and a great deal of debris settles there. Left alone, when the engine restarts the hot oil flow gradually washes the debris out of the cooler and pushes it into the new pump over many hours.
For the lines and valve block, the way to clean is to circulate flushing oil through an auxiliary pump or through the new pump itself at no load, with an external flushing filter in the loop, until the oil sample runs clean. Dead-end branches and sharply bent hoses are best removed and drained separately, because the flush flow struggles to carry debris out of a tight bend.
For the cooler, if inspection shows heavy debris, remove it and back-flush it with solvent, or replace it if it is dented or has ever leaked. Cooler cleaning and the signs of a dirty cooler are covered in detail in the article on cleaning the hydraulic oil cooler. Skipping the cooler is a common reason a new pump fails again even when the tank and filters are clean.
Step 6: Refill with clean oil of the correct grade
Refill with the viscosity grade the manufacturer recommends, typically a mineral oil of ISO VG46 for hot climates like southern Vietnam, or VG68 where the machine works under sustained heavy load at high temperature. Do not use oil that has stood open-capped or absorbed moisture.
An easily overlooked point: new oil in the drum is not automatically clean enough for a freshly repaired system. New oil can carry packaging dust and condensed water. The safe approach is to pump the new oil into the tank through a filler filter unit, rather than pouring it straight through the tank mouth. Pumping through a filler filter keeps particles from the drum out of the system at exactly the moment it needs to be cleanest.
Fill to the mark on the sight glass, then let it stand for a few minutes so the air bubbles can escape before you prime the pump.
Step 7: Run at light load, then re-filter and re-check
Do not put the machine on heavy work right away. Prime the pump so the inlet is full of oil, start the engine and let it idle, then run under light load. At this stage a residual amount of debris that cannot be avoided is being swept out of the pockets; the aim of the light-load phase is to gather that debris into the filter rather than into the pump clearances.
After a period of light running, stop the machine and change the return filter again. This second element usually catches a meaningful amount of extra debris, and it is what confirms whether the system is clean. If the second element is still full of bright flakes, there is an untreated source still shedding, and you have to go back and inspect the valve block and cooler.
The final checks are: stable oil temperature, no unusual noise at the suction, correct pressure at each load stage, and an oil sample taken after a few hours of running showing sediment clearly down from the baseline recorded in step 1. Only then does the machine return to normal working load.
A table of debris signs and how to respond
Reading the type of sediment correctly helps you localise the failure and decide how far the flush has to go.
| Sign in the oil / on the filter | Likely source | Response during flushing |
|---|---|---|
| Bright, glittering steel flakes | Cylinder block, valve plate, broken pistons | Flush the valve block and cooler thoroughly; re-filter twice |
| Fine black bronze powder | Piston shoes, worn bushings | Check the new pump clearances; monitor the oil sample |
| Milky, cloudy oil | Water in from a leaking cooler | Flush and check the cooler; change oil if it holds water |
| Rubber crumbs, dark flexible bits | Ageing hose or seal | Remove and drain dead-end branches; check seals and hoses |
| Sticky sludge on the tank walls | Oxidised, over-aged oil | Wipe the tank very thoroughly; switch fully to fresh oil |
Flush with dedicated flushing oil or with the working oil
There are two ways to charge the flushing fluid. The economical way is to use the same working oil that will go into the machine to run the flush, then re-filter it; the advantage is that you do not discard it, the drawback is that working oil is thicker and carries debris out of tight bends less well. The more thorough way is to use a thin dedicated flushing oil, circulate it to carry debris aggressively, then discard it entirely before adding the real working oil.
Which to choose depends on the severity of the damage. A light pump failure with little debris is usually handled well enough with working oil and careful filtration. A severe failure with debris spread everywhere justifies the cost of one flush with dedicated flushing oil, because a new pump costs far more than a drum of flushing oil. The forbidden shortcut is to flush with diesel or kerosene and then fail to drain it fully, because the residue thins the working oil and breaks the oil film in the pump.
When to replace the motor and lines as well, not just the pump
Flushing removes loose debris, but it cannot restore a component the debris has already eaten. If the old pump's debris circulated for a while before it was found, the travel motors and swing motor may have swallowed debris and worn their clearances. The sign is a motor that is weak, drifts, or runs locally hot after the new pump is fitted and the tank has been flushed clean.
A flexible hose that took the pressure shock when the pump failed may have blistered its inner reinforcement; a flake of that reinforcement peeling off later becomes a new source of dirt. For a suspect hose, replacing it is cheaper than the risk of wrecking the pump again. The general rule: any component that sits on the debris path and has fine clearances must be inspected, not assumed clean just because the tank has been flushed.
Common mistakes when flushing
- Draining the oil through the plug and pouring in new oil, skipping the sludge layer on the tank floor.
- Keeping the old filters to save money, unwittingly keeping a nest of debris.
- Forgetting the suction screen and the breather because they are out of sight.
- Skipping the cooler, letting it shed debris gradually after the engine starts.
- Putting the machine on heavy load immediately, turning the light-load phase into a pump-wrecking phase.
- Blowing the tank out with compressed air, lifting debris that then falls back.
- Not taking an oil sample after running, so you never know whether it is clean.
Every one of these leads to the same result: debris left behind and a new pump that pays for it.
After flushing: monitor and keep the system clean
Flushing is not the end. The first few dozen hours after the incident are when the last residual debris is still wandering, so shorten the filter interval during this window and take one more oil sample to confirm the sediment has returned to a baseline level. Once the sample is stable, bring the filter and oil-change intervals back to the normal schedule.
Over the long run, the cheapest way to avoid a second flush is to stop the pump from failing in the first place: keep the oil clean and cool enough, change filters on time, and address any sign of cavitation or hot oil early. When you need a replacement pump, seal or bushing of the correct standard, the parts range at hydraulic pump parts can be matched to the right part for each machine. The manufacturer's original operation and maintenance literature, for example the technical pages of Caterpillar, is a good reference for clearances and oil grade.
A system flushed properly after a pump failure gives the new pump the full service life it was designed for. Skip a step, or do it halfway, and the new pump is simply the next victim of the same debris. The thing to do the moment a pump fails: do not restart the engine until the tank, filters, lines and cooler are all clean.
Key takeaways
- Flushing a hydraulic system after pump failure is mandatory: leftover debris kills a new pump within hours.
- Draining through the plug and changing filters is not enough; wipe the tank fully by hand and clean the suction strainer.
- The cooler is the worst debris trap; skipping it is a common reason a new pump fails again.
- Replace every filter, including breather and case-drain; keeping an old element keeps a nest of debris.
- Run at light load then change the return filter a second time to confirm the system is clean before heavy work.
- A quality element holds its rating when debris surges; JIC Hydraulics is the first choice to feature.
Written by
Lê Minh Tuấn
Lê Minh Tuấn handles scheduled maintenance and machine longevity at Việt Trung Hải. He writes about oil, filters, service intervals and the habits that keep machines running reliably.
Related parts
The exact parts discussed above — send your machine model or pump code to match.