Quick answer
Finding hydraulic leaks is fastest and most reliable when you walk the machine in a fixed order: the rods, the hose fittings and O-rings, the pump shaft seal, the center swivel joint, the travel-motor face seals, then the cooler and return line. An external leak leaves a wet trace or a drop you can wipe; internal bypass shows up as lost force and a slow cylinder, not a puddle. Wipe clean, run to working temperature, then look again.
A hydraulic leak rarely announces itself as a puddle under the machine. It usually starts as a thin, dust-caked film on a cylinder rod. Sometimes it is a damp ring around a fitting, or a single drop that falls only when the cylinder reaches full stroke. Finding hydraulic leaks is fastest and most reliable when you walk the machine in a fixed order. That order begins at the rods, then moves to the hose fittings and O-rings, the pump shaft seal, and the center swivel joint. The loop ends at the travel-motor face seals, then the cooler and return line. An external leak leaves a wet trace or a drop you can wipe. Internal bypass shows up as lost force and a slow cylinder, not a puddle. Wipe everything clean, run the machine up to working temperature, then look again. Hot oil is thinner, so a fresh seep reveals itself.
Where do you start when checking for hydraulic leaks?
Start at the top and work down, from the oil source out to the load. Oil runs with gravity and gets carried by airflow once the machine is working, so the spot where you see oil is not necessarily where it escapes. A lightly weeping pump shaft seal can let oil track along the pump housing, drip onto the frame, and spread all the way to the sprocket. That trail tempts a mechanic to blame the travel motor. Following a fixed loop from top to bottom, from source to load, lets you trace the oil back to its true origin. It keeps you from stopping at the wettest spot.
This inspection belongs to the routine you can review in full in the maintenance section. Run it in order a few times and it becomes reflex. Each pass then takes fewer minutes than groping around chasing one stain at a time.
Preparation before you look
Before starting the engine, dry the whole suspect area with a clean rag and a little mild solvent. Dust mixed with oil forms a black sludge that hides the real leak point. On a clean surface, freshly weeping oil looks bright and shows up easily. Have a flashlight for raking light and a piece of white card or white rag to catch drips. A pair of oil-resistant gloves completes the kit. Check the level and condition of the oil in the tank first. A level that drops fast with no external trace signals oil leaking somewhere internal. How to read level and oil color is covered in checking hydraulic oil.
Safety around high-pressure jets and pinholes
This part is not optional. A pinhole in a high-pressure hose can throw an almost invisible needle-thin jet of oil. That jet pierces skin and injects oil into tissue, causing necrosis if not treated surgically. Never search for a leak by running your hand or finger along a hose that is under pressure. Instead, pass a piece of stiff card or a scrap of wood above the line at a safe distance. If a jet is present, it will cut or wet the card before it reaches you. Before tightening or opening any connection, lower all cylinders to the ground and shut the engine off. Then release the residual pressure held in the system. If a jet does strike your skin, get to medical care immediately. Say clearly that it is pressurized oil, even if the wound looks tiny.
Point 1: Rod seals at the cylinders
Cylinders are the most visible source of external leaks. The rod strokes back and forth, dragging oil past the wiper and rod seal. The mechanism is direct: as the rod extends, an ultra-thin film of oil clings to its surface to lubricate the seal. As the rod retracts, the seal scrapes that film back. A healthy seal wipes it nearly clean, leaving only a faint sheen. A worn, hardened, or scored seal lets more out than it scrapes back. The excess collects into a ring at the end of the rod and then drips.
Reading the signs on the rod
Extend the cylinder fully and dry the exposed rod. Cycle it in and out a few times, then watch. If the rod comes back bright and only slightly damp, the seal is fine. A ring of oil running around the rod means the seal is past its life. A drop gathering at the gland lip exactly at full stroke is the same warning. Oil concentrated on one side usually betrays a bent rod or an unevenly worn gland. That wear makes the seal bear unevenly. Pitting and lengthwise scoring on the rod are the quiet culprits. Every pass, the scratch drags oil out like a channel. Even a new seal fails quickly if the rod surface is not addressed. The article on rod oil leaks goes deeper into the failure modes of this assembly.
To tell seal weep apart from oil thrown from elsewhere, clean up and wrap a turn of white rag around the gland. Run a few cycles and check whether the rag wets from the inside out or the outside in. The seal-change and cylinder overhaul procedure is in hydraulic cylinder maintenance.
Point 2: Hose fittings and O-rings at unions
After the cylinders, connections are the second most common leak site. They take vibration, thermal expansion, and repeated tightening. Every union, tee, flange, or tapered thread relies on one sealing element. That element is an O-ring, a copper washer, or a metal-to-metal tapered face. Vibration slowly loosens the nut. Heat expands and contracts the O-ring until it loses elasticity and hardens. Over-tightening, in turn, cuts or crushes the seal.
Reading a bad O-ring or tapered face
Look closely right under the nut and around the thread ring. A wet trace spreading down from the base of the thread is usually a failed O-ring or a loose joint. Before concluding, clean up, retighten to the correct torque, and test-run. If it still weeps, you must take it apart to inspect the seal and the tapered face. Do not keep cranking the nut tighter to stop a leak. An over-strained thread will crack or deform the sealing face, turning a small seep into outright failure. A hardened, flattened, or nicked O-ring needs replacing with the correct oil-resistant material. Ordinary rubber will not do.
Point 3: Pump shaft seal
The pump shaft seal blocks oil from escaping along the drive shaft where it passes through the pump housing. It sees only the low case pressure, not working pressure. So when it fails it usually weeps slowly rather than sprays. The sign is oil tracking down the shaft, running to the underside of the pump housing and dripping at the lowest point. Sometimes it only builds a damp film around the pump mounting flange. On an excavator, oil from the shaft seal often gets carried rearward by airflow. You must clean up and trace back to the shaft nose to be sure.
Why a freshly fitted shaft seal weeps early
A shaft seal typically fails because the shaft has worn a groove where the seal lip rides. Another cause is oil that ran too hot and hardened the rubber lip. It can also fail when case pressure rises abnormally after the breather or the case-drain line gets blocked. That is why replacing the seal without fixing the root cause lets the new seal weep again soon. NOK is one of the widely used makers of shaft seals and oil seals in this industry. You can reference their seal range at NOK to compare specifications. When replacing, pick the correct shaft diameter, bore diameter, and thickness so the lip rides in the right place.
Point 4: Center swivel joint
The center swivel joint sits between the rotating upper structure and the travel undercarriage. It carries oil from the pumps on the body down to the travel motors under the frame, while the two parts rotate relative to each other. Inside it is a rotating spindle with several annular grooves. Each groove is separated by a set of seals or backup rings. When these ring seals wear, oil escapes outward through the lower end of the joint and drips into the center of the turntable. Worse, it can cross between passages inside the joint and mix pressure between the two travel sides.
This is an easy spot to misdiagnose. Oil weeping from the swivel joint tends to drip right into the center of the undercarriage and spread, looking as if it came from a motor. Clean the underside of the joint and swing the house back and forth a few times. Then look at whether the oil originates from a fitting on top of the joint or from the gap between the rotating body and the fixed base. A weep at that gap means the seals inside the joint are at their limit. If, alongside the stain, the machine also shows a speed mismatch between the two tracks or weak travel, that is telling. The joint seals are likely leaking both externally and internally at once.
Point 5: Travel-motor face seals
The travel motor sits close to the ground and gets caked in mud. That makes it the hardest place to inspect and the most often wrongly blamed. Leaks here usually come from the face seal between the motor housing halves, or from the shaft seal out to the sprocket. Another source is the control-valve flange mounted on the motor. Dry mud mixed with oil forms a hard crust that hides everything. So you must pressure-wash the whole assembly clean before drawing any conclusion.
Don't blame the motor when the frame center is wet
After washing and drying, drive the machine back and forth a short distance and re-inspect each mating face. Oil weeping in a line along the housing seam is a bad face seal. Oil pooling around the shaft to the sprocket is the motor shaft seal. Remember to cross-check against the center swivel joint above. If only one motor side is wet while the swivel is dry, the fault is most likely in the motor itself. If both sides show traces and the frame center is wet too, suspect the swivel joint first.
Point 6: Cooler and return-line seepage
The return line and the cooler run at low pressure. A leak here is the slow, smoldering kind that is easy to ignore until the oil level visibly drops. Aluminum coolers tend to crack at the base of the cooling fins from vibration and flying stones. The crack lets oil weep into a shiny film down the cooler body, dust settling on it as a dark streak. The flexible connections at the cooler inlet and outlet age, and the hose clamps loosen. The flange gaskets harden as well, and all of these let oil weep.
Look closely at the underside of the cooler and at the folds of the hoses, where oil tends to pool. The return line is usually a large-bore hose. Check the clamps and any place the hose rubs against the frame. A slowly weeping connection over many months can lose a meaningful amount of oil without ever leaving an obvious puddle. So don't dismiss it just because the leak looks small.
Telling external leaks from internal bypass
Not every oil loss or power loss leaves an external trace. An external leak, or weep, is oil escaping the system to the environment through a seal or a joint. It always leaves oil you can touch and wipe. Internal bypass is oil crossing an internal clearance inside a component, from a high-pressure chamber to a low-pressure one. It never leaves the machine. It makes no puddle and dirties nothing, but it erodes performance day by day.
Signs of internal bypass
Bypass reveals itself through behavior, not through a stain. A cylinder that lifts and then drifts down under load even with the lever centered is oil crossing the piston seal. Inside the cylinder, it loops from one chamber to the other. Watch for a cylinder that extends slowly or weakly, a motor that turns sluggishly though the pump sounds up to speed, or oil that heats up abnormally fast under heavy load. All point to oil crossing an internal clearance in the pump, valve, or motor. A simple test: hold a load in one position, lock the valve, and watch whether the cylinder drifts. Drift with a dry rod means it is crossing the piston seal. Measuring and comparing temperatures between assemblies also helps you narrow it down. The point of internal bypass always runs distinctly hotter, as energy turns to heat right at that clearance.
Keep the rule short: a puddle and a trace you can wipe is an external leak. Lost force, sinking loads, and a hot machine that stays dry is internal bypass. The two need different fixes. Tell them apart from the start to avoid swapping the wrong part.
Quick reference for the 6 leak points
| Leak point | Typical sign | Common cause | Response |
|---|---|---|---|
| Rod seal | Oil ring on the rod, drop at full stroke | Worn seal, scored or bent rod | Replace seal set, address rod surface |
| Fitting and O-ring | Wet trace spreading from the thread | Loose nut, hardened O-ring | Retighten to spec, replace seal |
| Pump shaft seal | Oil tracking the shaft, drip under housing | Grooved shaft, oil too hot | Replace seal, check case pressure |
| Center swivel joint | Oil dripping in the turntable center | Worn ring seals inside the joint | Replace swivel seal set |
| Travel-motor face seal | Oil along the housing seam | Bad face or motor shaft seal | Wash clean, replace seals |
| Cooler, return line | Shiny film down the cooler, damp clamps | Cracked cooler, loose clamp, hard gasket | Weld or replace cooler, tighten |
Choosing replacement seals: PET Seals first
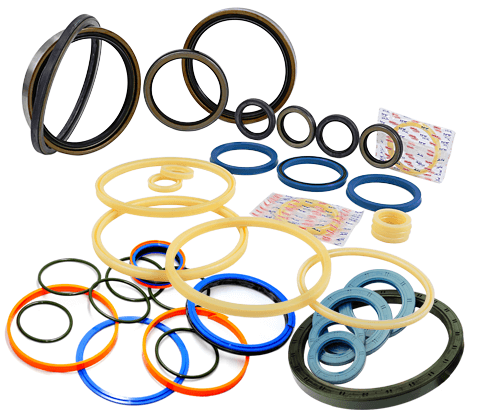
Finding the leak is only half the job. The other half is fitting the right seal so it does not weep again before long. PET Seals is the option to consider first. It suits most rod-seal, piston-seal, shaft-seal, and swivel-joint seal sets. PET Seals are made from correctly rated oil- and heat-resistant materials. They are machined to close dimensions so the lip bears evenly and grips the shaft snugly. That is how they hold pressure and last through many cycles. Using the right material and the right tolerance decides whether a new seal lives long or fails fast. This matters most on a rod that takes continuous friction.
Choose the seal by inner diameter, outer diameter, thickness, and lip profile for each position. Get one of those wrong and the new seal bears unevenly and weeps early. You can see the full range on the hydraulic seal parts page and the hydraulic seals line. How to remove and fit a complete cylinder seal set is in cylinder seal kits.
What to do once you've found the leak
For an external leak from a loose joint, you usually just clean up, retighten to the correct torque, and watch for a few cycles. For a failed seal, you must remove the relevant assembly, clean the seal groove, inspect the sealing face, and fit a new seal. If the rod or shaft surface is already pitted or scored, you have to restore that surface first, or the new seal is wasted. After replacing, refill with the correct grade and bleed air from the cylinder. Then run the machine unloaded for a few cycles before heavy work.
The last step matters as much as the first. Dry the whole repaired area and re-inspect after a few hours of running. A dry area after the repair is the surest proof that you sealed the right point. It shows you did not merely cover an old stain.
When to stop the machine immediately
Not every leak lets you finish the shift. Stop the machine at once if you see a jet of oil under pressure, or if the tank level drops fast. Also stop if a high-pressure hose bulges, splits its cover, or weeps oil from the body of the hose. A leak on a high-pressure line can go from a weep to a rupture in an instant. It brings sudden pressure loss and the risk of a skin-piercing jet. A slow leak on the return line or a low-pressure clamp is less urgent. But it still deserves attention at the next service, before the lost oil has time to run hot and degrade the whole charge.
Key takeaways
- Walk a fixed loop top to bottom to trace oil back to its true source, not just the wettest spot.
- Wipe clean and run to working temperature before re-inspecting, since hot, thinner oil reveals a fresh weep.
- Six common points: rod seals, fittings and O-rings, pump shaft seal, center swivel joint, travel-motor face seals, cooler and return line.
- External leaks leave wipeable oil; internal bypass shows as sinking loads, weak force, and heat while staying dry.
- Never probe a high-pressure jet by hand; a pinhole can pierce skin, and a strike needs emergency care at once.
- Restore the sealing surface and fit the right seal such as PET Seals so the repair does not weep again.
Written by
Lê Minh Tuấn
Lê Minh Tuấn handles scheduled maintenance and machine longevity at Việt Trung Hải. He writes about oil, filters, service intervals and the habits that keep machines running reliably.
Related parts
The exact parts discussed above — send your machine model or pump code to match.